
Before you start
You need a 64-bit Windows 10 or 11 PC, a USB data cable, and HardwareSerialMonitor. Windows 7 SP1 can run the client with .NET Framework 4.8, but it is a legacy system and has not been verified with every hardware configuration. Download and install the v1.4.4 installer. You can also use the MeowKit Windows package. Extract the entire ZIP before openingHardwareSerialMonitor.exe.
Connect MeowKit
1
Turn on and connect MeowKit.
Turn on MeowKit normally and connect it to your PC with a USB data cable.
2
Open PC Monitor.
On MeowKit, open Apps → PC Monitor.
3
Run HardwareSerialMonitor.
Run
HardwareSerialMonitor.exe as administrator. To make this permanent, right-click the file and select Properties → Compatibility → Run this program as an administrator.4
Open the Windows client.
Open the HardwareSerialMonitor icon in the Windows notification area. Select Show hidden icons if you cannot see it.
5
Select MeowKit's COM port.
Select MeowKit’s COM port. Wait a few seconds for the readings to appear.
Read the screen
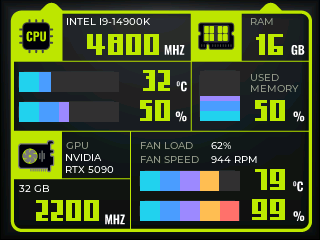
The top-left panel shows the CPU model, clock speed, temperature, and load. The top-right panel shows total RAM and the percentage in use. The lower panel shows GPU details, including temperature, load, clock speed, VRAM, and available fan readings. The meters update as MeowKit receives data from your PC.-- means the Windows client has not supplied a usable reading for that field. Sensor availability depends on your hardware and the Windows client.
Press and hold B to leave PC Monitor.